Lawn Mower is one of the essential tools for grass cutting. You can adjust its height whenever you need it so that it can provide better service.
In fact, you have to set your lawnmower blades at the correct height. Because without putting the lawnmower correctly, you can’t get a well-trimmed garden.
I guess you don’t know how to adjust lawn mower height? If so, never be worried.That’s because, in this article, I will provide you a process and some practical steps by which you will adapt your lawnmower height correctly.
So let’s start the process.
A Detail Process Of Adjusting Lawn Mower Height
The adjustment process is not so complicated at all. But you must know what size precisely works for you. If you can make a proper adjustment, then it is straightforward to use.
Let’s jump to the steps of adjusting lawn mower height.
Adjust your mower
Before starting the process of adjusting height, you have to park your lawnmower on a flat surface. It will help you to work comfortably.
Moreover, it will help to reduce the possibility of any kind of error while adjusting the mower. If your mower is gasoline-powered, you have to turn off the engine.
Make a measurement
Now you have to measure some most important facts which will help to get a better service.
- You should measure the air pressure of the lawnmower’s tires. Make sure that the tires’ air pressure is equal. Otherwise, the mower can turn over towards the side.
- You have to remove the ignition key.
- Brainstorm on your grass. It will help you to measure adjusting the height.

Make a perfect adjustment.
After completing the measurement process, you have to make a perfect adjustment. To accomplish this process, make sure of the following tasks.
- Measure the distance between ground and blade. For this process, you can use a measuring tape. It will provide you exact results on how height you need to adjust. When you have got the accurate number by the measurement tape, you may start the following process. Remember, it was the number of the height of the grass on the current setting of the mower.
- Now, set your lawnmower’s wheels at the same height. It will help to make the proper adjustments.
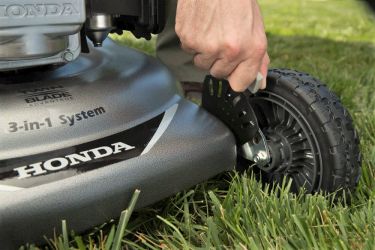
- If your lawnmower is a push one, then follow this step very carefully. You have to use the adjustment lever. The adjustment lever has been provided on the tires of the mower. From the measurement, you may get what you have to do. Raisen the wheels if you need them. On the other hand, if you need to lower the wheels, do it.
- If your mower is a push mower, then this step is for you. You may need a lowered mower. Never be afraid. Just adjust the nut perfectly, which is for lift link adjustment. Or you may need to raise the mowing deck. Try to do it perfectly.
- Sometimes, you may need side-to-side adjustment. It is an easy task. You have to turn the blades in adjustments. Now, use a ruler or measurement tape to decide the height of the edges from the ground. This measurement will immensely help you in cutting the grass.
- If your mower is a reel lawn mower, follow this process. You have to open the roller pin in the bracket. Make sure that the roller pins are adjusted at the higher hole of the frame. Never forget to make sure that the level of both pins is entirely identical.
Set the blade tip
In this process, you have to set the blade tip height perfectly. It has to be done from both sides of the mower. Keep in mind that you must make sure that the height of the blade tip is entirely the same. The level of the blade tip must be identical. The exact blade tip will help you to get a perfect cutting pattern and a better experience.
For your electric mower
In the case of an electric mower, the processes are almost the same. You have to stretch out the adjustment lever. If you need to cut at a higher level, then move the lever at the higher number to the back of the deck. But if you need to cut at a shorter level, then move the lever at the lower number at the onward of the mower.
Never forget to set your mower’s wheels at the same level. You should double-check for this purpose.
Take a test
Now your mower is ready to cut the grass. But before starting the final step, I recommend you to take a test of your lawnmower. Start to cut in a small area. If you find it is working well, then start the final step. But if it is not working well, try to adjust it again.
Safety Measure that you have to keep in mind.
If your mower includes many height options, then try to use the middle one. I hope it will be good for you. But if you can’t find the desired result, then try a different one.
Pro tips for you
- Make sure the desired level of the lawnmower height.
- Keep in mind that grasses have differences. So adjust the height according to grass. Otherwise, you may face difficulties.
- Low your mower height for the summer season. And raise for the cool season.
- Mow your lawn often to keep shorter mowing heights.
- Use your blades according to the provided mechanism.
- If you want your lawn to consume more water and look light color, use the highest level mown.
Final verdict
You can apply the process as mentioned above for a perfect and exact cutting of your lawn’s grass. I hope you understand the whole process clearly.
The process is not complicated. Just follow the process step by step and start to cut your grass.
So let’s apply the process step by step and get a vigorous lawn.
Good luck.
