
If you are a lawn mower user, it is important for you to know everything about a lawn mower. We know that lawn mowers are used to give all kinds of grass a certain shape. But if there is no side discharge, sometimes it is difficult to cut large grass.
Large grasses and grass debris are sometimes stuck with the lawn mower’s cutter. Which makes the lawn mower stand out.
So, will you stop? Never. You know when there is a problem, then, of course, there is a solution.
A lawn mower side discharge can relieve you of this hassle. If you are searching for how to install side discharge on lawn mower, you’ve come to the right place.
In this article, we will let you know all about lawn mower side discharge installation. So, let’s start.
In this content you’ll learn:
The Process To Install Side Discharge On Lawn Mower
In this article, we will present the entire process to you very simply. And that will give you a complete idea of how to install the side discharge of the lawn mower. It may take approximately 10 to 15 minutes to complete the task.
So, without talking more, let’s get started.
Required Tools:
- Bolts and hooks: Bolts and hooks will help you to attach the side-discharge to the lawn mower.
- Socket wrench: A socket wrench is needed to properly attach the side-discharge to the lawn mower. It has a socket attached to one end to help you tighten the bolts and hooks to the mower.
If you don’t have the perfect one, you may try this one.
- Discharge chute: A new discharge chute is required to install with the lawn mower.
Before starting the installation work, have a look at the lawn mower’s user manual you used. The user manual will help you avoid any unwanted hassles. You will find the user manual on lawn mower’s company website.
Steps to follow:
Step #1: Unplug The Power Cord
To protect yourself from being electrified, first disconnect the battery from the power plug. This will prevent accidentally turning the mower on when installing the side discharge.
Step #2: Remove Discharge Chute Bolts
Find out where the old discharge chute is. If it is connected by using bolts, remove them with a socket wrench. Turn the socket wrench counterclockwise and bring out the bolts.
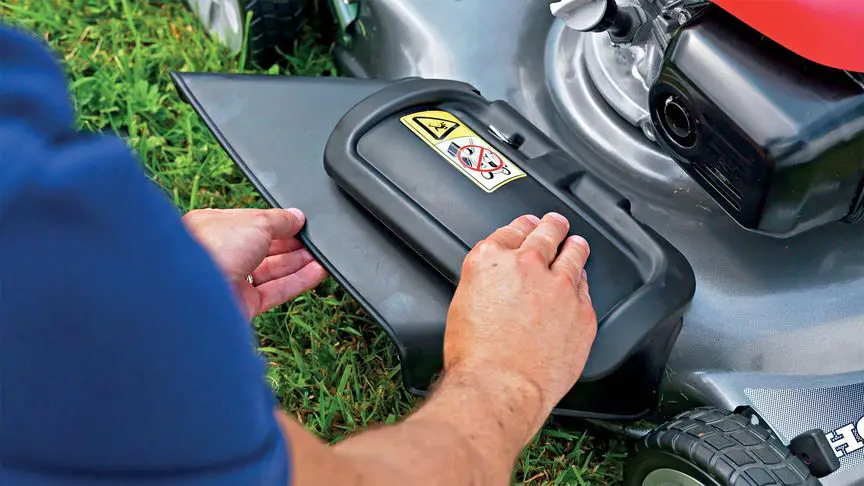
Step #3: Install Discharge Chute
If the discharge chute is covered by a mulch plug, then pull the mulch plug upwards. Carefully attach the hooks of the discharge chute to the grip of the mulch plug.
Step #4: Test The Discharge Chute
Check whether the discharge chute is well fitted. You can understand it with a slight drag. A loose discharge chute is likely to drop down from the lawn mower. If the discharge chute falls down, it can damage the blade.
Step #5: Lower The Mulch Plug
When the side discharge chute is properly installed, lower the mulch plug and the lawn mower is ready to be used again.
All The Steps In A Nutshell:
- Unplug the power cord.
- Remove the bolts and hooks of the old discharge chute.
- Pull the mulch plug upwards.
- Install the new side discharge properly.
- Lower the mulch plug and check the whole thing again.
Done. The lawn mower is ready to use.
Cautions:
After knowing the entire installation process, some precautions should be taken to avoid any unwanted accidents.
- Never remove the side-discharge while the mower is on. There is a possibility of your hand touching the blade.
- Never turn the mower without setting the side-discharge well. As a result, the mower is likely to be damaged.
- Don’t forget to unplug the power plug.
Advantages of Side Discharge:
- It makes easy to cut long, thick and moist grasses.
- Side discharge doesn’t allow grasses to be trapped in the cutting area.
- It remains the blade free from grass debris.
- Using it saves time and increases workflow efficiency.
Disadvantages of Side Discharge:
Sometimes side discharges make it difficult to see large boulders that can break the blade when it enters into the cutting area of the mower. Big rocks can hit you if they enter into the cutting area of lawn mower. So, before operating the lawn mower, remove large boulders from your lawn.
Final Verdict:
The process we mentioned above is the easiest and the most used process of installing side discharge of lawn mower. Feel free to try this at home. It will reduce your repair costs or need for lawn mower insurance, and will also increase your skills to handle a lawn mower personally..
But always try to follow the cautions.
We hope, this article on how to install side discharge on lawn mower has helped you to get a better understanding of the installation process.
They suck. Cant even get a diagram to replace belt. 2 belts broke . Never buy another one