Have you ever encountered uneven cuts with your lawnmower? It happens due to the dullness of the blades. And so, they need a little bit of sharpening to do the trick.
Still, sharpening up a mower blade might seem like a lot of work to do. Well, guess what? You can achieve super-fast results by learning how to sharpen mower blades with the angle grinder.
That is right. All you need is an angle grinder, and your problems will be solved in no time. So, give the entire article a thorough read as we discuss different aspects of the process.
When to Sharpen Up Mower Blades?
There are no hard and fast rules for when to sharpen your mower blades. However, you can certainly watch for a few signs that indicate the condition of your mower blade’s sharpness.
Now, the very first sign lies in the appearance of the blade itself. You see, whenever your mower blades start losing their sharpness, they tend to become dull. You can easily notice the difference if you monitor it regularly.
Next up, you will experience uneven cuts when you mow your lawn. This one is considered as the major sign of degradation of your blades. The blades slowly become blunt, and they can no longer perform consistently. That is why we see that unevenness in the grass.
Finally, dull mower blades also affect the health of the grass. Instead of cutting the tips neatly, they tend to crush them. As a result, the tips of the grass start turning brown. Whenever you notice any of these signs, take immediate steps for sharpening your mower’s blades.
Sharpening Up Mower Blades with Angle Grinder
A disk or angle grinder is well known for its polishing and abrasion properties. That is why it works extremely well in sharpening your mower’s blades. Check out our step-by-step guideline below where we explained the entire process.
Initial preparations
The methodology starts with gathering up all the essential tools and equipment. You will need: an angle grinder, wrenches, clamps, and sandpaper; you will also need gloves and goggles for safety purposes.
After gathering up the tools, we will move forward to the lawnmower. Disconnect all the wires and the spark plugs to avoid accidents. Also, consider flipping the mower sidewise or elevating it to get better access.
Dismantling lawnmower body
Alright. We now have a clear view of the mower because of the initial setup. Now, begin with removing the nut. Don’t worry if it is stiffened and not coming out. Simply apply a bit of lubricant on it, and let that sit for a while.
After some time, use a wrench to carefully pull that out. Here, we have an interesting tip to prevent the blades from spinning during the process. You can use a piece of wood, stick that in to hold the blades in place.
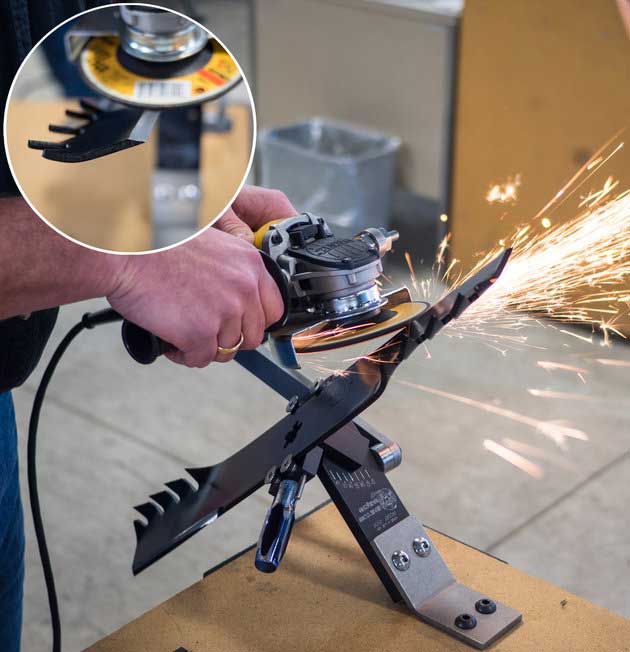
Get the blades ready
Once the blades are detached, place them on a slab or table. While doing that, do not forget to check whether it is fully secured or not. Now, when you take a closer look, you will notice the double-cutting edges.
The idea is to work on one side at a time. So, decide which side you will work on first. Also, clean off all remaining grass-bits and debris from it. You can use sandpaper or even a regular brush to do so.
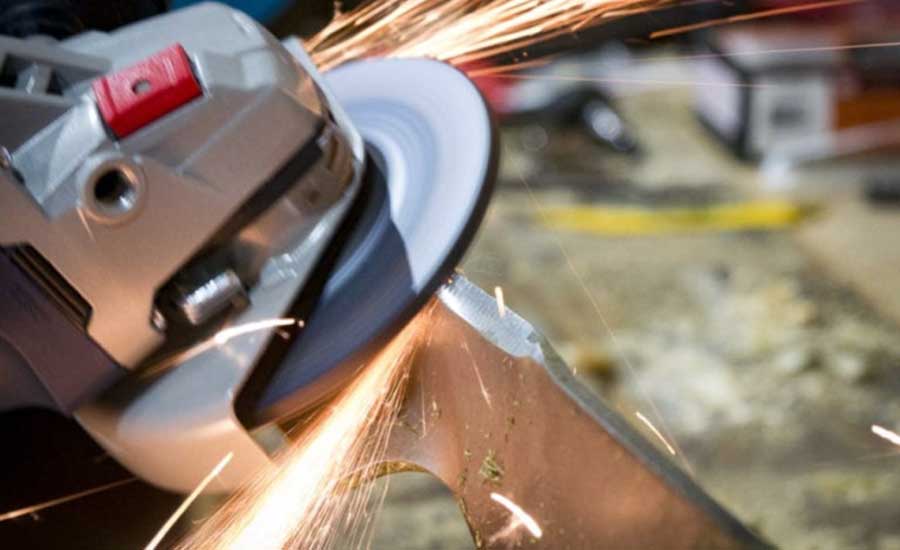
Bring in the angle grinder
It is time to set up and configure the angle grinder at this point. The abrasive stone of the grinding disk takes off the uneven bumps from the blade and makes it sharp and smooth. Therefore, attach the grinding disk and place one edge of the blade in front of it.
The grinding might produce a fair amount of flying sparks, so do not forget to put on your safety goggles to avoid getting anything in your eyes. Moreover, we recommend you wear thick gloves while using the grinder.
Start filing
Start filing one edge of the blade using the grinding disk. Always go in with a constant motion and scrape off a thin layer of metal from the blade. Feel free to take breaks between the sessions to check on the progress.
Once you are done with one side, flip the blade in the opposite direction. Now, repeat the same process to the other side of the blade. Pay close attention to make sure that both sides are equally sharpened. You can also try balancing the blade on a nail to figure out which side is heavier.
Post sharpening care
After scraping off a thin layer from the metal, the blade is more exposed As a result, it might rust easily going forward. Nonetheless, you can avoid all that with proper care after the sharpening session.
When you finish with the filing, coat the blade with a generous amount of lubricant. Now, by that, we are not telling you to pour oil directly on the blade. It might mess up the mower’s configuration.
So, grab a piece of cloth or rag and drench it in the lubricant. After that, apply it to your blades using the rag. This way, you can avoid a messy situation without any difficulties.
Reassembler lawnmower
Using a wrench, reattach the nut at the center of your mower blade. Do not forget to secure it tightly so that it does not move away from its place.
A loose blade can make mowing more challenging. Not just that, it can also increase the risk factors. So, to avoid that, double-check the nuts.
Take out the additional wooden block as well (you used it in the previous step for stopping the blades from moving).
Finally, plug in all the wires and the spark plug that you had previously taken out. Now, give your lawnmower a go and test the superb performance of your freshly sharpened mower blades.
A Few Precautionary Measures
There is no doubt that routine sharpening, with the help of an angle grinder, can greatly enhance the efficiency of your lawnmower. Nevertheless, you should be aware of several precautionary measures to avoid any accidents.
One of the most crucial aspects is the level of sharpness that you want to acquire. Always remember that you do not want to make your blades ultra-thin. Otherwise, it will be vulnerable and can easily get cracked.
Besides, that much sharpness can result in self-injuries as well. So, make sure that the blades hold a firm shape and are not too thin.
Again, when you are working with an angle grinder, choosing the correct gradient is extremely important. To achieve maximum results, you can opt for an angle between 45 to 60 degrees. Otherwise, you might overdo the grinding, which can mess up your blades. So, it’s important to keep all of this in mind.
Final Words
Once you start learning how to sharpen mower blades with an angle grinder, it will take some time for you to get used to the process. Therefore, try to be patient and give yourself a fair amount of time.
By doing that, you can ensure outstanding results with the tiniest investment. So, get ready to say goodbye to all those time-consuming sharpening methods, and enjoy the benefits of this super-efficient technique!