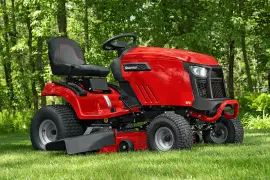
A snapper riding lawn mower is so easy to operate if you have a clear idea about its functionalities. Otherwise, you may get hurt or injure yourself. So, first of all, you have to know how to start a Snapper Riding Lawn Mower.
Basically, following a few steps is enough to start the Lawn Mower. And you just need to get detailed information about those steps.
Only then you can start your Snapper confidently. So, to make your task easier, we are going to describe the steps properly throughout the whole article.
So, let’s have a look…
In this content you’ll learn:
How To Start A Snapper Riding Lawn Mower?
If you want to start a Snapper Riding Lawn Mower, your first step needs to be getting familiar with the different parts as well as their functions. And, the manual can help you through this. After that, you need to follow the following steps accordingly-
1# Check The Level Of Oil:
Inspecting the oil level is the first and of course, the most important step in this process. Don’t worry, it’s so simple to check the oil level of the Snapper. You just need to find the cap for filling oil, and then take the cap off.
You will find a dipstick included with it. There are mainly two limits on it and the oil level of the crankcase (metal cast housing that protects an engine’s crankshaft) needs to be near the maximum or upper limit. But should not cross the limit.
On the contrary, if it is found that the level of the oil is much lower, then the Snapper may die out after starting. Also, it can be the reason for turning the mower too hot. That’s why, when you find the oil level at some lower position, you must add an accurate amount of oil.
2# Fill The Tank:
You need to go through this step when you find the oil level too low or the tank is totally empty. If you use new and fresh fuel for each use of the Mower, then I would say it’s the best practice.
With the help of the manual, you can easily identify the requirements of fuel type as well as other information related to fuel. Remember not to let gasoline stay in the tank for more than one month. Because it can lessen the efficiency of the mower.
3#Take Your Position On The Seat:
Taking your position properly on the seat seems the obvious step to follow. There are sensors in some newer models that identify whether the operator is on the seat or not. If it doesn’t find the operator on the seat, it never lets the Snapper start.
So, before starting the Snapper, you must place yourself comfortably on the seat. Also, you will have to check whether the feet can reach the brakes or not. And hence, your hands need to reach the steering.
4# Apply The Brakes:
After positioning yourself on the seat, you will have to apply the brake and hold it in the same position for a few moments. Like the automobile, the brake of a Snapper is generally a pedal under the feet.
In the case of some models, the Snapper Riding Lawn Mower contains a lever in lieu of a pedal-type brake. You just need to reach it as well as press the brake.
5# Apply The Parking Brake:
Different models of Snapper Riding Lawn Mowers come with parking brakes of different positions. But most of the time, it is placed exactly on the left of the Snapper. The parking brake is basically a knob and you need to rotate it whenever you remove your feet from the brake.
6# Use The Neutral Gear:
Now, you need to move the gear level to some neutral position. Usually, the snapper riding lawn mower comes with a lever setup located close to the steering. If there is no knob of the parking brake in the riding mower, then you need to keep pressing the brake pedal in case of shifting gears.
7# Place The Throttle:
The throttle lever basically exhibits the speed along with some particular calibration. It is normally presented through some symbol, for example- a low or high or any character like a turtle or a rabbit. You need to locate the lever in some choke position.
8# Enter The Key:
There is an ignition switch in the Snapper Riding Lawn Mower. You will have to enter the particular key into the switch as well as turn it exactly to the right. Then, you must hold the key for nearly 15 seconds in that position. Whenever you hear the sound of ignition, just leave it.
9#Start Ignition:
You shouldn’t get upset if your engine doesn’t start on with the foremost ignition. You just need to take the key out and wait a little bit. After that, insert it in the same way. Most of the time, the Snapper starts at the second attempt.
10# Adjust Speed:
If you succeed to start the engine, then you have to go to the throttle lever. Now, you need to move the lever to some fast position from that choke position. Even, the throttle lever can be moved to some medium position also.
Thus, you can let the mower warm up as well as idle for a while.

Final Words:
As you have seen, we have described how to start a Snapper Riding Lawn Mower. Hopefully, you got an in-depth idea on it and get to know the parts and their functionalities accordingly.
As you have read all the steps properly, you can confidently start the Snapper Riding Lawn Mower. Don’t hesitate, just follow the steps properly from first to last.
Surely, now you can easily start your Snapper. If you have further queries, then don’t hesitate to let us know.
We would love to help you with the proper advice. Till then, best of luck!
