From 1830, people have been using lawnmowers to make their lawn nice and lucrative. And day by day, the functionality of the lawn mower increased and people can enjoy the benefits of lawn mowing.
But you know, you only enjoy the benefits when all the functions of the lawn mower work according to your commands. A faulty lawn mower will never be able to follow your instructions properly.
If you have a craftsman lawn mower, you can only cut grasses less than 42 inches. When you try to cut larger grasses with a craftsman lawn mower, it loses its ability to cut. The reason behind this is grass gets stuck to the mower’s blade and the drive belt is torn down.
Now come to the point. What can you do when the drive belt is torn or broken? Is it possible to replace it? Of course, you can replace it.
In this article, we will let you know all the possible information on how to replace the drive belt on a Craftsman lawn mower.
Let’s find out what is the new waiting for you.
In this content you’ll learn:
The Process Of Replacing The Drive Belt On Craftsman Lawn Mower
The replacement process of a drive belt is the same in all lawnmowers. If the drive belt doesn’t work properly, you can not take the lawn mower forth. So if you find any fault with the drive belt of your lawnmower, you should take immediate steps to replace it.
But at first, let’s know some important data regarding this replacement:
- The difficulty of repairing: 3 out of 5
- Approximate time frame: 20-30 minutes
Now it’s time to gather the necessary tools that are required to replace the drive belt. These tools will make your task smooth and toilless.
Tools required:
Steps to follow:
Step #1: Prepare The Lawn Mower
Take the lawnmower into your garage or a flat surface. Note that a sloped surface creates trouble in the time of repairing.
Step #2: Disconnect Power Cable
Disconnect the power cable from the battery. This will save you from being electrified.
Step #3: Seal The Fuel Tank
Now take off the cover of the fuel tank. Cover the face of the fuel tank well with a plastic sheet and reattach the cover. When you work, it will prevent fuel emissions.
Step #4: Lift The Front Wheels
Press the rear handle downwards to lift the front wheels upwards. This time place a wooden block between the blade and the front deck.
Step #5: Remove The Blade
Using a socket wrench, turn the blade’s screws counterclockwise. Be careful when opening the screws so that the blade can not fall down.
Step #6: Clean The Shaft
Use a cleaning brush to clean the dirt attached to the shaft. This will make your task easier.
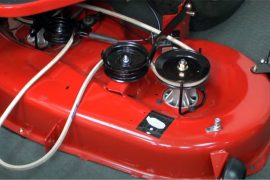
Step #7: Bring Out Crankshaft Pulley
Locate the crankshaft pulley and rotate it counterclockwise. When you bring out the crankshaft pulley, you can easily free up the drive belt.
Step #8: Lower The Front Wheels
Remove the Wooden Block and bring the mower back to the previous position.
Step #9: Install The New Drive Belt
Now, this is time for the installation of the new drive belt. Insert the drive belt through the front of the deck and make sure it touches the transmission pulley.
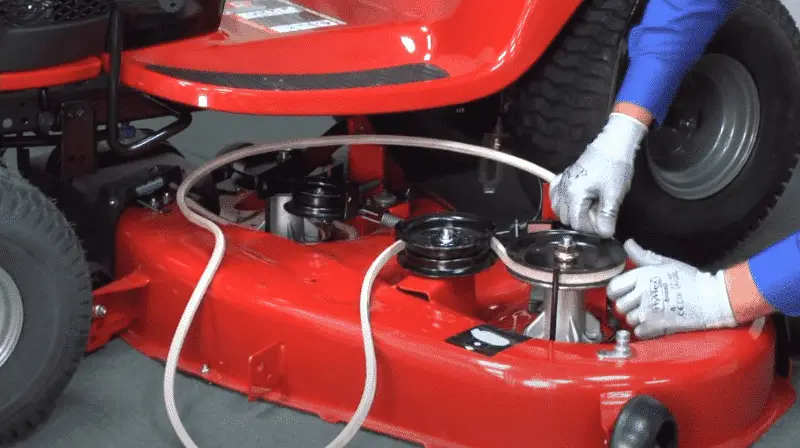
Step #10: Settle Drive Belt With Transmission Pulley
Pull the front hood upwards and settle the drive belt with the transmission pulley. When the settlement is done, lower the front hood.
Step #11: Lift The Front Wheels Again
Again press the rear handle downwards to lift the front wheels. Place the wooden block again under the front deck.
Step #12: Replace Crankshaft Pulley
Replace the crankshaft pulley in its previous position by rotating it clockwise. Attach the drive belt with the crankshaft pulley carefully.
Step #13: Reinstall The Blade
Now it’s time to reinstall the blade. Settle the blade with the crankshaft pulley by using screws. Use the socket wrench to tighten the screws.
Step #14: Lower The Front Deck Again
Once the blade is fitted, carefully remove the wooden block and lower the front deck of the mower.
Step #15: Unseal The Fuel Tank
Remove the plastic sheet placed under the cover of the fuel tank.
Step #16: Connect The Power Cable
Connect the power cable with the battery.
Done! Your lawnmower is now ready to make your lawn clean and tidy.
Cautions:
- Before starting the replacing work, make sure the power of the lawn mower is turned off.
- Be careful when removing and attaching the blade with the lawn mower.
- Carefully operate the socket wrench to avoid any kind of unexpected injury.
Final verdict:
Replacing a craftsman lawn mower drive belt is relatively a difficult task if you first try this. This is also a time-consuming task.
But if you go through the above-mentioned processes, you will surely be successful. And hopefully, this article has helped you to understand how to replace the drive belt on a Craftsman lawn mower.
But if you don’t understand the above-mentioned process, we suggest you not to try this at home by yourself. It can be quite risky for you because you need to remove the cutting blade to replace the drive belt. You better call an expert technician to replace the drive belt.
Hello Todd, I am in the market for a 0 turn mower. So naturally I’m looking at your 10 best 0 turn platforms. The information is great pretty much everything I’m interested in.
I do wish 2 things were mentioned. One,which ones are built entirely in the US? Unless I missed it I don’t see any mention of where. Two its cool you added a link to check the price but why Amazon? I’ve found at least 6 other sites with discounts, 0 interest for 3 years and other perks. A link to competitive pricing would have been a more appropriate link. Just a few names to look at. I use Amazon alot but mostly when I need something yesterday. Their delivery methods are the best, no doubt,
but their prices? By far not the best.
Unless dare i say your choice to use Amazon has a reason behind it? Also, when I used your link to check on used lawnmowers…..it took me directly to of all places
Amazon which by the way i found No used anything.
Stay safe, stay healthy.
Respectfully,
Neal in Western, NC.
Hi Neal,
Most of the John Deere factories are located in the North America, and Europe. And they also have a factory in India.
You asked why we recommend only Amazon. Alright, Amazon is the best platform so far for online shopping. That’s why we mostly recommend them.
Thanks